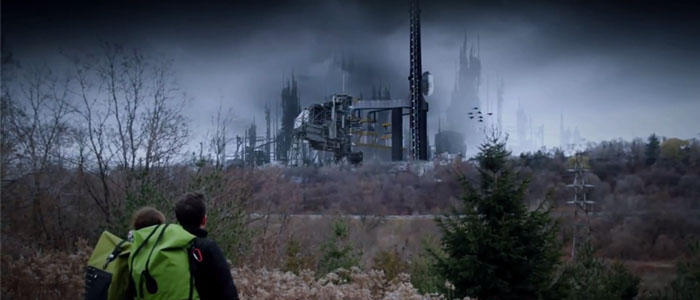
Fig 1. Hope short film starring Chris Public and Mindy Eklove
This blog will explain how I used the incredible technique of matte painting and applied it to my shots to achieve a different effect each time in order to help tell the story. I’ve been working on several visual effects shots for a few projects over the past year. I am currently wrapping up a short film about a mother who fights against all odds to save her dying daughter, check out our page to learn more.
Here’s a basic run down of achieving this effect:
A) Controlled Movements. Therefore, no extravagant camera work where it’s panning or moving around a lot. Once you have taken your shot, you will need to track it. The matte painting technique will usually be done in 2D , so the tracking data can be collected via softwares like Mocha. You can also use the integrated tool from Adobe After Effects named “Track Motion”. Sometimes, you will need to manually track your shot frame by frame in order to get an accurate result. There are also times where you will need to track “off” frame as the footage may not have sufficient tracking points. You may also need to track several points within a shot to achieve better results in a frame. In Mocha, accurate tracking is achieved by creating shapes around a subject. Watch some of these videos samples on the different ways of tracking footage to get a better understanding.
B) Foreground and Backround Separation. There are several methods to achieve this. You can use the rotoscoping technique, which is time consuming but will work if your shot was not originally intended to be used for visual effects. If you used a green screen, you can use the chroma key tool. Check out this link for a tutorial on advance keying. Most of the time, visual effects artists will use a combination of both effects. After Effects CC has recently released a new tool to separate the background from the foreground without using a screen in the finer detailed parts of a subject, such as hair. It is called “Refine Edge Tool”. Click here for a tutorial.
C) Matte Creation. The most popular software to create your matte painting is Adobe Photoshop. Link the tracking data to it and start your composite. Colour correct to the foreground layer and the matte painting layer so that they match. Then you can colour grade your shot for an artistic touch. A really basic and free tutorial about this technique can be found at videcopilot.net
Note that in each example below, a variation of the same technique is used described from above.
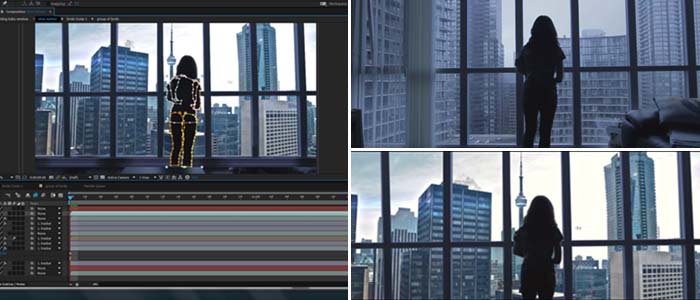
Fig 2. Rotoscoping technique used to extract the foreground from the background.
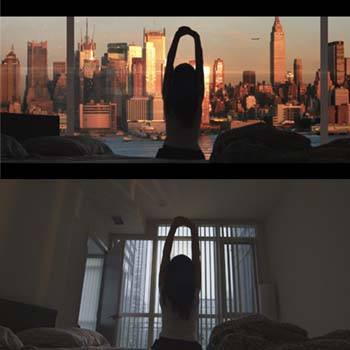
1) The Big Apple: First up in our example is a project that was filmed in one day for our organization. Watch it here. The video was shot in Toronto with our fashion stylist Deanne Wilder stretching in the foreground (Fig 3.). Here, we used the rotoscoping method by moving each mask almost frame by frame since the shot wasn’t originally intended for visual effects. The “Refine Edge” tool helped to soften the hair and the fine details in the shot.
A picture of New York city was placed into the background along with an animated lens flare (Fig 3.). We placed an aircraft in the distance to add realism. We also added a window frame as well as grime on the glass.
2) Futuristic Cityscape: A short film starring Chris Public and Mindy Eklove. Watch it here. In this shot, we separated the tree line with the matte painting (Fig 1). A painting was created in Adobe Photoshop by placing several elements from various building structures together to create the “launch pad” that was depicted in the film. The structures on the right side of the matte painting showed faded architecture to give depth and distance to the shot.
This shot was tracked using the 2D method, a light was animated onto the “launch pad”, and digital birds were created to sell the shot.
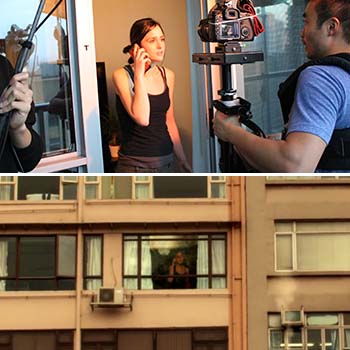
3) Hong Kong Heat: This method was created by placing the matte painting in the foreground and having the filmed shot placed behind it (Fig. 4). There were markers placed on set. Markers are usually small pieces of tape stuck onto walls so editing softwares can track the camera’s movement in post. Once the information was obtained, it was applied to the foreground layer so that the picture would stick. We then animated the camera digitally to zoom outward, reviewing part of the building. Animated elements were added to the air conditioning units as well as smoke coming out of the windows.
The matte painting had a cut-out in the window so that our actress Lindsay Ogus could feel as if she was looking out the window over Hong Kong. A digital window frame and glass with grime was added into the opening. A warp effect was created as the camera passed through digital glass. See the tutorial here on how we achieved this effect in more detail.
We created a path for the digital camera to continue the movement backward in post production. When the camera moved back, we adjusted the levels on our actress’ layer to simulate the change in lighting when light is reflected off the glass.
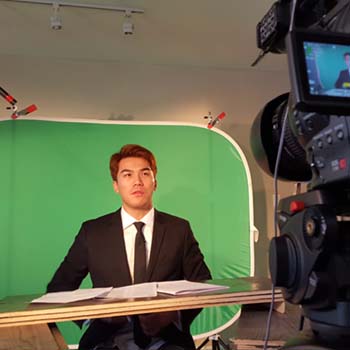
4) Going Green: If you don’t have access to certain sets or backgrounds needed to tell your story, why not create it in post? That’s exactly what we did in this shot here (Fig 6.) Everything you see in the background was added in post. Our actor Jia was sitting in front of a green screen as a news anchor (Fig 5). His desk was made out of several planks of flooring stacked on top another to make it look like he was sitting behind a large boardroom news table (although it didn’t show in the final shot).
Lighting is important on any green screen shot as you will need to key it out while sustaining the quality. In our setup, two lights lit the screen while a back light and filler lit our subject.
Once in post production we removed the green screen via “keylight 1.2” from After Effects. The background was replaced with news room footage, and everything was colour corrected to match the shot. We created lower third titles and a thumbnail on the right part of the screen to help describe what he was discussing. No tracking markers were used as the camera was stationary.
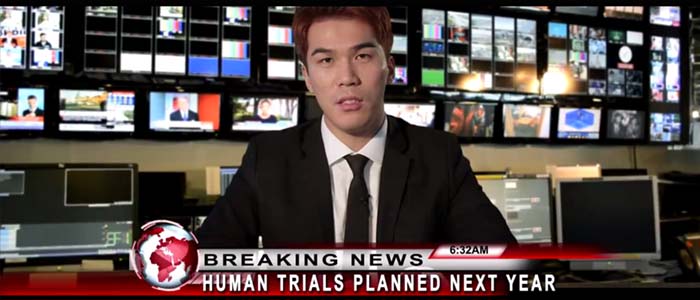
Fig 6. Green screen background removed with several layers of effects.
Again, this technique is very similar to the first one, instead of separating the character from the background by rotoscoping, we used the green screen technique. Instead of using a still image and adding animated elements to it, we used video.
Using matte painting can be a great way to add production value to your project at an inexpensive cost, and can greatly assist in telling a better story. Help us share this article if you find it useful and if you have any questions in regards to video editing or visual effects, be sure to contact us. Like always, happy editing!
